Quantcast
Channel: Development | Stoneridge Software
Viewing all 118 articles
Browse latest View live

How to Programmatically Create Queries in Dynamics AX and the Surprises Your Data Can Bring

$
0
0

NOTE: For this article, a vendor has been created with the account number of MyVendor, and an account name of MyVendor, Inc.

There are times when you need to retrieve data out of Dynamics AX that will not allow you to write ‘while select…’ statements.  This is where you can create queries in Dynamics AX, and build the where clause via range values on your query.  This sounds fairly simple, but you have to be aware of what you are retrieving from the database, as you can see some rather unexpected results.

For example, say we wanted to loop through the DirPartyTable to find possible duplicates based on a vendor name.  You want to create something that is basically select * from DirPartyTable where name like ‘your name goes here’

To demonstrate this, I have created the following job (please note that this is for demonstration purposes only and used for help explain the concept I am trying to expand upon):

static void QueryRangeThoughts(Args _args)
{
    Query query;
    QueryBuildDataSource qbds;
    QueryBuildRange qbr;
    QueryRun queryRun;

    Counter cntr = 0;
    Counter vendCnt = 0;
    str myRange = '';

    VendTable vendTable;

    select firstOnly vendTable where vendTable.AccountNum == 'MyVendor';

    if (vendTable)
    {
        // get the name for the search.  We want the portion that exists prior to the first space
        cntr = strFind(vendTable.name(),' ',1,strLen(vendTable.name()));
        myRange = subStr(vendTable.name(),1,cntr - 1 ) + '*';
    }

    query = new query();
    qbds = query.addDataSource(tableNum(DirPartyTable));
    qbr = qbds.addRange(fieldNum(DirPartyTable,Name));
    qbr.value(myRange);

    queryRun = new queryRun(query);
    while (queryRun.next())
    {
        vendCnt++;
    }
    info(strFmt("Vendor count: %1",vendCnt));

}

When this is run, I get the following:

How to create a query in Dynamics AX infolog

Knowing my data, I know that is not correct.  So, lets figure out what is going wrong here.  What query is being generated by my code.  I modified the code to show me:

static void QueryRangeThoughtsDebug(Args _args)
{
    Query query;
    QueryBuildDataSource qbds;
    QueryBuildRange qbr;
    QueryRun queryRun;

    Counter cntr = 0;
    Counter vendCnt = 0;
    str myRange = '';

    VendTable vendTable;

    select firstOnly vendTable where vendTable.AccountNum == 'MyVendor';

    if (vendTable)
    {
        // get the name for the search.  We want the portion that exists prior to the first space
        cntr = strFind(vendTable.name(),' ',1,strLen(vendTable.name()));
        myRange = subStr(vendTable.name(),1,cntr - 1 ) + '*';
    }

    query = new query();
    qbds = query.addDataSource(tableNum(DirPartyTable));
    qbr = qbds.addRange(fieldNum(DirPartyTable,Name));
    qbr.value(myRange);

    info (query.toString());

    queryRun = new queryRun(query);
    while (queryRun.next())
    {
        vendCnt++;
    }
    info(strFmt("Vendor count: %1",vendCnt));

}

The highlighted line is used to show me the generated query in my Infolog box:

Building Queries in Dynamics AX

Looking at what is generated, the where clause is incorrect.  The desired where clause should be myVendor* with NO OR clause.  What is going on?

After walking the code in the debugger, the issue is apparent.  Look at the range value in the debugger:

Building Queries in the Debugger, Microsoft Dynamics AX

Notice the myRange variable value is MyVendor,* in the debugger.  When this is added to the value of the query range the value is interpreted as Name = N’MyVendor’ OR Name LIKE N’*’ not what we want.  The comma character is NOT being removed from the vendor name string prior to the range being created.

The following code shows one way to address this:

static void QueryRangeThoughtsCompleted(Args _args)
{
    Query query;
    QueryBuildDataSource qbds;
    QueryBuildRange qbr;
    QueryRun queryRun;

    Counter cntr = 0;
    Counter vendCnt = 0;
    str myRange = '';

    VendTable vendTable;

    select firstOnly vendTable where vendTable.AccountNum == 'MyVendor';

    if (vendTable)
    {
        // get the name for the search.  We want the portion that exists prior to the first space
        cntr = strFind(vendTable.name(),' ',1,strLen(vendTable.name()));
        myRange = subStr(vendTable.name(),1,cntr - 1 ) + '*';
        myRange = strRem(myRange,',');
    }

    query = new query();
    qbds = query.addDataSource(tableNum(DirPartyTable));
    qbr = qbds.addRange(fieldNum(DirPartyTable,Name));
    qbr.value(myRange);

    info (query.toString());

    queryRun = new queryRun(query);
    while (queryRun.next())
    {
        vendCnt++;
    }
    info(strFmt("Vendor count: %1",vendCnt));

}

The strRem function was used to simply remove the comma from the range string value PRIOR to applying the string as the range.  This creates the query as desired, and gives us the information we expect:

Query object in Dynamics AX

Based on what is in my data, the above is correct, and as we can see in the query, the where condition created is what is desired.

The moral of the story ends up being “know your data”, “plan for the unexpected”, and “ test, test, test” so things like the above don’t randomly start appearing as the data changes.  The possibilities are endless in data, so we have to try to catch what we can so the expected results are shown.

Well, that’s all for now. Happy coding!


Updating the Next Rec ID Sequence in Dynamics AX

$
0
0

Recently I had to create database records outside of Dynamics AX. I used SQL to move some records from ISV tables to new standard tables within AX. There was a ton of data, so it was much faster to insert these records using SQL. Initially, I overlooked one important factor. When I created these records outside of the AX environment, the SystemSequences table was not updated.

The SystemSequences table stores the next RecID by table in the AX environment: https://msdn.microsoft.com/en-us/library/systemsequences.aspx
If this table is not updated properly, the users will see duplicate record errors that may not make sense to you. The users had sent me this error below. When I looked at the data, the Load ID did not exist. It didn’t throw an error about Rec IDs, so it’s a bit misleading.

RecIDSequence_Nicole

The issue was that I had created records in the WHSLoadTable outside of AX.  The SystemSequences table wasn’t updated, so the next value of the Rec ID was incorrect and throwing an error. In this situation, you must update the SystemSequences table. You’ll need to find the max value for the table and update to the max value + 1.

Here is a portion of the SQL used to fix this issue:

DECLARE @MaxRecID BIGINT
 	DECLARE @NextVal BIGINT

SELECT @MaxRecID = MAX(RECID)
FROM WHSLoadTable

SELECT @NextVal = NEXTVAL
	FROM SYSTEMSEQUENCES
	INNER JOIN SQLDICTIONARY
	ON SQLDICTIONARY.FIELDID = 0
	AND SQLDICTIONARY.name = 'WHSLoadTable'
	AND SQLDICTIONARY.TABLEID = SYSTEMSEQUENCES.TABID

	IF (@NextVal > @MaxRecID)
	BEGIN
		PRINT 'WHSLoadTable did not need to be updated.'
	END
	ELSE
	BEGIN
PRINT 'Updated WHSLoadTable from ' + CONVERT(VARCHAR(MAX), @NextVal) + '' to '' + CONVERT(VARCHAR(MAX), @MaxRecID + 1)

		UPDATE SYSTEMSEQUENCES
		SET NEXTVAL = @MaxRecID + 1
		FROM SYSTEMSEQUENCES
		INNER JOIN SQLDICTIONARY
		ON SQLDICTIONARY.FIELDID = 0
		AND SQLDICTIONARY.name = 'WHSLoadTable'
		AND SQLDICTIONARY.TABLEID = SYSTEMSEQUENCES.TABID
END

I hope this helps you out!

Using ‘Organize Project by Element Type’ for New Solutions in Dynamics 365 for Operations Development

$
0
0

I was recently developing a new custom solution in Dynamics 365 for Operations. After adding a few new elements I noticed that they were just being added to the project solution and were not being categorized. I like having categorization, especially if there are a large number of elements in the solution. You can get these elements organized by type by doing the following.

My new project includes a table, three classes, and report.

organize-project-element-type-eric-meissner1

To organize by element:

  1. Go to Tools – Options
  2. Find the Dynamics 365 tab and select Projects
  3. Check Organize projects by element type

organize-project-element-type-eric-meissner2

  1. Click OK

One thing you will notice is that if you already have elements in your project they won’t get organized.  However, if you add any new items then those will. If you forget to check this property before you start adding elements to the project you can still get the organized by manually creating the folders.

Right-click on the project name and select Add – New folder

organize-project-element-type-eric-meissner3

After creating the new folders select the objects and drag them into the element type folder. Then all elements are organized by type and any new ones created will be added to the appropriate folder.

organize-project-element-type-eric-meissner4

Pretty simple, but if you are new to Dynamics 365 for Operations development you can spend a lot of time digging through all of the properties trying to find the one you are looking for.

Changes to the X++ language in Dynamics 365 for Operations

$
0
0

For the most part, the X++ language in Dynamics 365 for Operations is the same as it has always been. This is good news for all of us who have been active in the language for several years. Learning a new language is one thing we don’t need to worry about when moving to the latest version of the product. Having said that, here are some small language tweaks you might find interesting:

7 Language tweaks to X++

1. You can declare variables anywhere you want to. Variables don’t have to be declared before you use them.

2. In all previous versions, if you declared a variable in the classDeclaration you could not set it in the classDeclaration. Now you can set them as soon as you declare them.

3. You can use constants rather than macros. Macros are still supported but they appear to be well on their way out of the language.

4. The keyword var can be used when declaring variables. You don’t have to specify the exact type; the system will figure it out for you. This feels like lazy programming so you may or may not be interested in this change.

5. In try/catch statements you can use a finally block that will get executed regardless of whether an exception is thrown.

6. When referring to managed assemblies you can add a using statement to your X++ class. Once you have a using statement, you don’t have to use the full namespace in your X++ code to call the objects within the referenced assembly.

7. When building cross company statements, if you want to select from a subset of companies, you do not have to add the subset to a container. You can put the companies directly in the select statement like this:

select crossCompany : ([‘company1’] + [‘company2]) custTable;

X++ Select Statements That Look More Like SQL

$
0
0

As I’ve progressed as an AX developer, I’ve had to lean on many of the skills that I had from a former job as a C# developer where I used a lot of SQL queries. Working with data in X++ is similar until you try to write it like it would be written in SQL.

I would like to explain a quick tip that I got when working with multiple joins recently in X++,  as well as some other best practices when working with data.

Working with vendTrans and ProjTable, I needed to join a few tables to get to the data that I needed.  As I stated above, I came from a very SQL query heavy development environment, so my first step when working with data like this is to write it in SQL.


SQL Statement:

select p.Name, p.Workerresponsible, p.custAccount, v.ProjId, vit.*,
	from PSAPwpInvoiceTransView as v
        	inner join VendInvoiceTrans as vit
			on vit.RecId = v.VendInvoiceTransRecId
		inner join VendTrans as vt
			on vit.InvoiceId = vt.invoice
		inner join ProjTable as p
			on p.ProjId = v.projId
        where vt.voucher = '#########'

First X++ select:

select vendTrans
            join vendInvoiceTrans
            join ProjId from  view
            join Name, WorkerResponsible, CustAccount from projTable
                where projTable.ProjId ==view.ProjId
		   && vendTrans.voucher == '#########'
		   && vendInvoiceTrans.InvoiceId == vendTrans.invoice
		   && vendInvoiceTrans.RecId == view.VendInvoiceTransRecId

As you can see above, I have all of the same joins and fields selected. There are definite differences in the languages that you cannot get around, but the tip that I received allows you to better see and understand were your joins are and where you might have an issue.

Easier to read X++:

select firstonly vendTrans
            where vendTrans.voucher == '#########'
        exists join vendInvoiceTrans
            where vendInvoiceTrans.InvoiceId == vendTrans.invoice
        exists join view
            where vendInvoiceTrans.RecId == view.VendInvoiceTransRecId
        exists join projTable
            where projTable.ProjId ==view.ProjId


More X++ Select Statement Tips:

1. Place the where clauses for each join under the line adding the join and table.

This gives you a better view of which fields are being joined, and helps with debugging if you have issues. This also give you a more “SQL-Like” visual of the select statement.

2. Make sure that you are using the correct joins. 

As seen above, I had inner joins on all of the tables and was selecting fields that I thought I needed.  After some testing, I realized the best practice is using Exists Joins, as then I did not need the fields from the joining tables and I only needed to make sure they existed in the table.  This speeds up the select as well as returns only the data that you need from VentTrans.

3. Use field groups to select ONLY the values that you need. 

As seen in the first X++ select that I wrote, I added a few of the fields that I needed from each table. Example:

join Name, WorkerResponsible, CustAccount from projTable

This will return only the fields stated, whereas without calling them out you would get all fields from the projTable.

4. First only and First fast. 

In the second select code block, I added the firstOnly directive.  This directive speeds up the data retrieval by getting the first record that it needs. FirstFast was not a great solution to this as it may still incur overhead setting up the cursor to support additional results.  Therefore, if you know there is only a single row, use First only.

Using the new Chain of Command feature in X++

$
0
0

Recently a new feature for X++ developers was announced from Michael Fruergaard Pontoppidan (MFP) called Chain of Command. I knew I would want to try it out as soon as I had some time and it is pretty slick. This post will show it in action with a simple example in Microsoft Dynamics 365 Enterprise edition (AX7).

Syntax Requirements

My example is nothing flashy. It shows how to raise an Infolog message when a sales line is added to a sales order and the customer does not have a credit rating. Since I know that when you add a sales line, the SalesLineType class is called and the insert method is used. My plan was to create an extension for the SalesLineType class and put custom code in the insert method. Here is the code for the new extension class:

[ExtensionOf(classStr(SalesLineType))]
final class SalesLineType_Extension
{
    public void insert(boolean dropInvent, boolean findMarkup, Common childBuffer, boolean _skipCreditLimitCheck)
    {
        CustTable   custTable;

        //get customer for evalation of credit rating
        custTable = CustTable::find(salesLine.CustAccount);

        if(!custTable.CreditRating)
        {
            info("Customer on sales line has no credit rating!");
        }

        // must call next when using Chain of Command pattern
        next insert(dropInvent, findMarkup, childBuffer, _skipCreditLimitCheck);
    }

}


Note the usage of the ExtensionOf attribute and the requirement to use the next keyword. The compiler told me to mark the class final so I did that also. Since the insert method in the SalesLineType class is public, I also had to use public in the extension class.
For reference, here is my project which is based on a new package in Visual Studio:

Project in visual studio

Here is the Infolog when saving a new sales line:

Infolog of a new sales line

Debugging Tip

One issue I ran into was around debugging with Visual Studio. The symbols would not load for my breakpoints. To resolve this, I marked the below setting in the Visual Studio debugging options. In addition to this one, there is also a similar setting in the Dynamics 365 node.

Debugging in visual studio

Chain of Command was released with Platform Update 9. You can find more information in this “What’s New or Changed in Dynamics 365 for Finance and Operations” article.


How to use a Query Range Status on a Filterable Grid Field in Dynamics AX

$
0
0

I had a recent request to make a field filterable on a grid in Dynamics AX.

I checked the form control and saw that the field was coming directly from the datasource. So I checked the usual properties… Allow edit was no on the control and the datasource. Skip was no on both the control and the datasource. I noticed the auto declaration was no, so I wasn’t initially expecting it to be changed in the code.


A quick find for refnum in the code and I noticed the below change:

They used the range status of hidden to limit the ability to filter on the field. Cool! Something I’ve not used before and wanted to share!

Customizing the Check Report via Extensions in Dynamics 365 for Operations

$
0
0

Recently I was asked to customize the Cheque_US report in Dynamics 365 for Operations. Based on this guidance from Microsoft I expected it to be a relatively easy and straightforward process. Here’s what I did to customize the check report via extensions:

  1. Duplicate the Cheque_US SSRS report to a model that extends the Application Suite model.

I called my new report MyCheque_US and added some text to indicate that it was the custom report—that way I could tell at a glance if I was looking at the stock report or my custom report.

  1. Create a new class MyChequeController that extends the ChequeController class in the same custom model.

Copy the main() method from ChequeController, and update it to use the report name for MyCheque_US:


class MyChequeController extends ChequeController
{
    public static MyChequeController construct()
    {
        return new MyChequeController();
    }


    public static void main(Args _args)
    {
        MyChequeController controller = new MyChequeController();
        controller.parmArgs(_args);
        controller.deleteTempData();
        //controller.parmReportName(controller.getChequeReport());
        controller.parmReportName(ssrsReportStr(MyCheque_US, Report));
        controller.parmShowDialog(false);
        controller.parmDialogCaption("@SYS24090");
        controller.startOperation();
    }

}

  1. Extend the Cheque_US output menu item in the same custom model.

Set the Object property to refer to MyChequeController rather than ChequeController

I then compiled my solution and deployed the MyCheque_US report, and when I generated a payment everything worked! Well, almost everything: the custom report displayed as a blank page. I verified that if I switched back to the stock controller code controller.parmReportName(controller.getChequeReport()) then everything printed fine, but if I ran the same data through the MyCheque_US report it would fail every time.

After some digging I came to a startling conclusion. Based on its name and signature, I was trusting getChequeReport() to be a true accessor method:

When I inspected the method itself, though, it quickly became apparent that it was something very different:


/// <summary>
    /// Calls the initialize method and returns a cheque report type.
    /// </summary>
    /// <returns>
    /// A cheque report type.
    /// </returns>
    public SrsCatalogItemName getChequeReport()
    {
        this.init();
        return chequeReport;
    }


ChequeController.getChequeReport() violates two method writing best practices: a method should do only one thing, and method names should reveal intention.

The giveaway that getChequeReport() does more than one thing is the “and” in the documentation summary. If you need to use the word “and” when describing what a method does, the method does too many things!

Admittedly, the method name getChequeReport does communicate what the method returns. The problem is that it doesn’t communicate everything that the method does. Had it instead been named initAndGetChequeReport then the intent of the method would be clear (and would clearly indicate that the method does too many things.)

In hindsight it would have been better to split getChequeReport() up into two methods, one to initialize the report and the other to retrieve the report name. In the end I decided that the least risky way to solve my problem was to keep the stock call to parmReportName() in place, and follow it up with another call to parmReportName() to direct execution to my custom report:


public static void main(Args _args)
    {
        MyChequeController controller = new MyChequeController();
        controller.parmArgs(_args);
        controller.deleteTempData();
        controller.parmReportName(controller.getChequeReport());
        controller.parmReportName(ssrsReportStr(MyCheque_US, Report));
        controller.parmShowDialog(false);
        controller.parmDialogCaption("@SYS24090");
        controller.startOperation();
    }


Now the report gets properly initialized, and my custom report design is used to generate the check.


Working With Kernel Based Classes and AOT Based Tables in Dynamics AX

$
0
0

Thinking in the Abstract

If you have seen some of my blog articles before, you may have noticed that I look at automating documentation from time to time. This article will expand on the concept a bit, and use different components of Dynamics AX to accomplish or demonstrate some of the more abstract ways to retrieve information.

In the past, I have used TreeNode (https://msdn.microsoft.com/en-us/library/gg958198.aspx) to work with AOT-based objects. However, if working with just tables and fields, a lot of information can be retrieved by using some kernel based classes. I will demonstrate a couple here.

The first kernel based class is the DictTable class (https://msdn.microsoft.com/en-us/library/dicttable.aspx). DictTable allows you to retrieve information specific to a table. To use the object, the X++ code will resemble the following:

DictTable dictTable;
TableId tableId = tableNum(CustTable);

dictTable = new dictTable(tableId);


At this point, the dictTable object is instantiated and will be referencing the data for the CustTable table. Information about the table can be retrieved via method calls from the object. The DictTable documentation in the link above provides an example of retrieving and displaying some of the information on the table.

The next kernel based class is the dictField class (https://msdn.microsoft.com/en-us/library/dictfield.aspx). DictField is used to retrieve field information from a table. More on this in a moment, as I want to bring in another kernel based object before we start working with DictField.

The next kernel based object I want to bring in is the SQLDictionary table (https://msdn.microsoft.com/en-us/library/sqldictionary.aspx). This table describes the current state of the database with respect to the table and field metadata. For the purposes of our discussion, we need to work with two fields, tabId and fieldId. The tabId column is used to denote fields that exist in a specific table. FieldId is the field number of the field within the specific table. IF the fieldId value is 0, it is the ‘header’ record for the table, and it does not represent an actual field in the table.

NOTE: Do NOT go in and start randomly changing information in the SQLDictionary table. This will cause many issues within the system.

So, why do I bring this up? Well, using SQLDictionary in combination with DictField, you can work in the abstract with table information.

Here is an example:

// define a specific table Id, use the CustTable table in the demonstration
TableId tableId = tableNum(CustTable);
FieldId fieldId;

SqlDictionary sqlDictionary;
DictTable dictTable;
DictField dictField;

while select sqlDictionary
    where sqlDictionary.tabId == tableId
    && sqlDictionary.fieldId != 0
{
    dictField = new DictField(tableId,sqlDictionary.fieldId);

    info(strFmt("Name: %1, Label: %4, Label Id: %3, Base Type: %2", dictField.name(),dictField.baseType(),dictField.labelDefined(),dictField.label()));
}


The above code, when placed in a job, will list out all the fields in the table, the name, the base type (string, int, real, etc.), IF the field has a label defined on it, the label Id will be displayed, and the actual label text for this field. By looking at the documentation page for DictField, you can see what information you can retrieve from the method calls.

Also, using these objects, you can work abstractly, and actually work with data in the tables. Here is an example:

static void AbstractionDemoJob(Args _args)
{
    #define.AccountNum("ACCOUNTNUM")

    // define a specific table Id, use the CustTable table in the demonstration
    TableId tableId = tableNum(CustTable);
    FieldId fieldId;
    Common buffer;

    SqlDictionary sqlDictionary;
    DictTable dictTable;
    DictField dictField;

    dictTable = new dictTable(tableId);


    select firstOnly sqlDictionary
        where sqlDictionary.tabId == tableId
        && sqlDictionary.fieldId != 0
        && sqlDictionary.name == #AccountNum;

    if (sqlDictionary)
    {
        fieldId = sqlDictionary.fieldId;
        buffer = dictTable.makeRecord();
        buffer.(fieldId) = "BillTest";
        buffer.insert();

    }
}


Notice the code in the if statement. IF we get a SQLDictionary record for CustTable where there is a field named ACCOUNTNUM, we can use that information to fill in data. The above code gets the field Id from the SQLDictionary record, then it uses the common object and DictTable to create a table buffer based on CustTable. Then it sets the AccountNum field to BillTest, and finally inserts the record into the table.

Also, please note that additional information can be retrieved by using the SysDictField object instead of DictField (https://msdn.microsoft.com/en-us/library/sysdictfield.aspx). This inherits from DictField, and expands on the functionality provided.

In summary, as I have stated before, knowing some of the kernel based classes provides some rather unique tools for many different purposes. I hope I have provided some basis for thinking outside of the box on using Dynamics AX based objects.

Dynamics 365 for Operations Development Training Opportunities

$
0
0

Join our online Dynamics 365 for Operations development training courses for the opportunity to enhance your skills and expertise!

Changes in Development From Dynamics AX 2012 to Dynamics 365 Online Course

November 14 – 16

What are the major changes in the developer experience working with Dynamics 365 for Operations? Take a look at what has changed in the world of Dynamics AX development with a guided tour from the seasoned experts at Stoneridge Software! In this online class, you will get a detailed look at the variants of the development experience from Dynamics AX 2012 to Dynamics 365 for Operations. You will learn about Visual Studio, models, forms, and many other new and fun features. Get ahead of the curve and learn the new AX development.

This three-day Changes in Developer Experience Course will be held online from 11 a.m. to 3 p.m. (CDT) from Tuesday, November 14 to Thursday, November 16.

Register here!

Changes in Development Course Outline:

  • Visual Studio Overview
  • AX Architecture
  • Tables & User Interfaces
  • X++
  • Security
  • Data Entities

Dynamics 365 for Operations Development Training Workshop

January 29 – February 16

This three-week course covering Microsoft Dynamics 365 for Operations Development training will be held online from Noon to 2:00 p.m. (CT), Monday – Friday, over three-weeks from January 29 to February 16, 2018.

Stoneridge Software’s Dynamics 365 for Operations Development training, provided by our seasoned development team will provide students with an overview of the architectural and development features and the tools available in the development environment. This workshop covers the essentials of doing development in Microsoft Dynamics 365 for Operations, including creating tables, classes, forms, and reports.


Dynamics 365 for Operations Development Course Outline:

  • Visual Studio Overview
  • AX Architecture
  • Data Types and Tables
  • User Interfaces


  • Debugging and X++ Control Statements
  • Objects and Classes
  • Accessing the Database
  • Exception Handling
  • Security for Developers


  • Working with Data
  • Classes
  • Forms
  • Reports
  • Data Entities

Register here!

How to Use the modelutil.exe to Delete a Model Name in Dynamics 365 for Operations

$
0
0

While getting introduced to development in Dynamics 365 for Finance and Operations, I found myself in a situation of adding/removing a model. There is a helpful tool we can use called “modleutil.exe”. This executable can be levied to accomplish a multitude of possibilities such as, import, delete, replace, and export.

In order to use the modelutil.exe to delete a model name, you first need to know where the modelutil.exe is located. Navigate to the AOSService folder, drill down in the PackagesLocalDirectory and its bin folder. The modelutil.exe is best used in a shell, which is a program that allows a command-based interface to the system’s kernel. Use CMD.exe or PowerShell.exe.

Working in the solution, I came across an issue that resulted in a harsh lesson. I made a model that I later did not need, only to find that the name was taken when I wanted to create a new model. For this instance, I created a model named Model1. I could not reuse the name Model1. Because modelutil.exe was not fully understood, I dug into the file structure. I recommend that you should not do that.

When using the modelutil.exe, you must understand some details. First, the exe requires you to use a command line tool, like command prompt. In a command line tool run the “modelutil.exe /?” this will display the following text.

ModelUtil.exe
Usage: ModelUtil.exe -export -metadatastorepath=[path to metadata store] -modelname=[name of the model to export] -outputpath=[path to the folder where the model should be saved]

Usage: ModelUtil.exe -import -metadatastorepath=[path to metadata store where model should be imported] -file=[full path to the file to be imported]

Usage: ModelUtil.exe -replace -metadatastorepath=[path to metadata store where model should be imported] -file=[full path to the file to be imported]

Usage: ModelUtil.exe -delete -metadatastorepath=[path to metadata store] -modelname=[name of the model to delete]

Usage: ModelUtil.exe -importxref -file=[path of xref file to import] -server=[sql server] -database=[database name]

If you notice, there are five different options to choose from: export, import, replace, delete, and importxref. Each of those options has further requirements. For the metadatastorepath, you will need the path to the PackagesLocalDirectory. For the modelname, you’ll need the model’s name.

The case that I described above will require the fourth option, the ‘-delete’ option. Once I deleted the previous model, I was able to continue to create a new Model1 model in Visual Studio.


How to Download a OneBox VM for Dynamics 365 for Finance and Operations

$
0
0

One of the biggest changes Microsoft introduced with Dynamics 365 for Finance and Operations is the new Visual Studio-based development experience and new all-in-one OneBox development environments. In addition to an Azure-hosted option, they also make it very easy to quickly stand up a local Dynamics 365 development instance by offering a downloadable virtual hard disk image.

If you have access to LCS, you can download and install a OneBox VM to run a Dynamics 365 for Finance and Operations development environment locally:

1.  Log in to https://lcs.dynamics.com with your Microsoft account

2.  Click on the “Shared asset library” tile:

Shared asset library

3.  Select the “Downloadable VHD” asset type, and find the files for the version you want to download. Here I selected version 7.3, update 12:

Downloadable VHD

4. Once all of the parts have been downloaded, run the file ending in “.part01.exe” It will prompt you to select where to create the .vhd file:

Downloading a onebox VM

5.  After the extraction process completes, you will have a VHD file that you can host with Hyper-V:

VHD file

6.  If you are new to Hyper-V, you can find information on creating and configuring virtual machines here.

Learn to Use a Label Creator Add-in Extension in Dynamics 365 for Finance & Operations

$
0
0

Creating labels has always been considered a chore by developers, and the task hasn’t really gotten any easier with Dynamics 365. Wouldn’t it be nice if you could type your value into the property and let Visual Studio move it to a label file? Luckily, we can. I’ll show you how to use the label creator Add-in extension in Dynamics 365 for Finance & Operations.

Start by creating a new Dynamics 365 Developer Tools Add-in project.

Create new Dynamics 365 Developer Tools Addin project

This will create a new class library project that contains two source files. The first, DesignerContextMenuAddIn.cs, contains boilerplate code for creating a designer add-in. The second, MainMenuAddIn.cs, contains a menu add-in.

Label Creator Addin Extension

The first thing we will need to do is to add a few references to our project:

  • C:\Program Files (x86)\Common Files\Microsoft Shared\MSEnv\PublicAssemblies\
    • EnvDTE.dll
    • EnvDTE80.dll
  • C:\Program Files (x86)\Microsoft Visual Studio 14.0\Common7\IDE\Extensions\5hutepyf.xp2\
    (Your folder may vary slightly)
    • Microsoft.Dynamics.Framework.Tools.LabelEditor.dll
    • Microsoft.Dynamics.Framework.Tools.ProjectSystem.dll
    • Microsoft.Dynamics.Framework.Tools.ProjectSupport.dll
  • C:\AOSService\PackagesLocalDirectory\bin\
    • Microsoft.Dynamics.AX.Metadata.dll
    • Microsoft.Dynamics.Framework.Tools.AutomationObjects.dll

Our designer’s context menu is controlled by the DesignerMenuExportMetadata attribute on the class. You can see in the screenshot that by default our add-in will appear in both the Form and Table designers.

The OnClick method is called when the user clicks on our menu. We will modify this method to convert the text contained in the Label property to an actual label. To do this, create regular expression to distinguish between a label identifier and a normal string.

private static Regex newLabelMatcher = 
    new Regex("\\A(?<AtSign>\\@)(?<LabelFileId>[a-zA-Z]\\w*):(?<LabelId>[a-zA-Z]\\w*)", 
    RegexOptions.Compiled | RegexOptions.CultureInvariant);
 
private static Regex legacyLabelMatcher = 
    new Regex("\\A(?<LabelId>(?<AtSign>\\@)(?<LabelFileId>[a-zA-Z][a-zA-Z][a-zA-Z])\\d+)", 
    RegexOptions.Compiled | RegexOptions.CultureInvariant);

These expressions will be used by the following methods.
private Boolean IsValidLabelId(String labelId)
{
    bool result = false;
 
    if (String.IsNullOrEmpty(labelId) == false)
    {
        result = DesignerContextMenuAddIn.IsLegacyLabelId(labelId);
        if (result == false)
        {
            result = (DesignerContextMenuAddIn.newLabelMatcher.Matches(labelId).Count > 0);
        }
    }
 
    return result;
}
 
private static Boolean IsLegacyLabelId(String labelId)
{
    bool result = false;
 
    if (String.IsNullOrEmpty(labelId) == false)
    {
        result = (DesignerContextMenuAddIn.legacyLabelMatcher.Matches(labelId).Count > 0);
    }
 
    return result;
}

Handle the click event in the OnClick method.  Here we will test the selected object, get the object’s model and label file, and create the label.
public override void OnClick(AddinDesignerEventArgs e)
{
    ModelInfoCollection modelInfoCollection = null;
 
    IMetaModelService metaModelService = null;
    // Get the metamodel provider
    IMetaModelProviders metaModelProvider = ServiceLocator.GetService(typeof(IMetaModelProviders)) as IMetaModelProviders;
 
    if (metaModelProvider != null)
    {
        // Get the metamodel service
        metaModelService = metaModelProvider.CurrentMetaModelService;
    }
 
    try
    {
        // Is the selected element a table?
        if (e.SelectedElement is ITable)
        {
            ITable table = e.SelectedElement as ITable;
 
            modelInfoCollection = metaModelService.GetTableModelInfo(table.Name);
            AxLabelFile labelFile = this.GetLabelFile(metaModelProvider, metaModelService, modelInfoCollection);
 
            this.createLabel(table, labelFile);
        }
    }
    catch (Exception ex)
    {
        CoreUtility.HandleExceptionWithErrorMessage(ex);
    }
}

private AxLabelFile GetLabelFile(IMetaModelProviders metaModelProviders, IMetaModelService metaModelService, ModelInfoCollection modelInfoCollection)
{
    // Choose the first model in the collection
    ModelInfo modelInfo = ((System.Collections.ObjectModel.Collection<ModelInfo>)modelInfoCollection)[0];
 
    // Construct a ModelLoadInfo
    ModelLoadInfo modelLoadInfo = new ModelLoadInfo
    {
        Id = modelInfo.Id,
        Layer = modelInfo.Layer,
    };
 
    // Get the list of label files from that model
    IList<String> labelFileNames = metaModelProviders.CurrentMetadataProvider.LabelFiles.ListObjectsForModel(modelInfo.Name);
 
    // Choose the first
    // What happens if there is no label file?
    AxLabelFile labelFile = metaModelService.GetLabelFile(labelFileNames[0], modelLoadInfo);
 
    return labelFile;
}
 
private void createLabel(ITable table, AxLabelFile labelFile)
{
    if (this.IsValidLabelId(table.Label) == false)
    {
        table.Label = this.FindOrCreateLabel(table.Label, table.Name, "Label", labelFile);
    }
 
    if (this.IsValidLabelId(table.DeveloperDocumentation) == false)
    {
        table.DeveloperDocumentation = this.FindOrCreateLabel(table.DeveloperDocumentation, table.Name, "DeveloperDocumentation", labelFile);
    }
}
 
private String FindOrCreateLabel(String labelText, String elementName, String propertyName, AxLabelFile labelFile)
{
    string newLabelId = String.Empty;
 
    // Don't bother if the string is empty
    if (String.IsNullOrEmpty(labelText) == false)
    {
        // Construct a label id that will be unique
        string labelId = $"{elementName}{propertyName}";
 
        // Get the label factor
        LabelControllerFactory factory = new LabelControllerFactory();
 
        // Get the label edit controller
        LabelEditorController labelController = factory.GetOrCreateLabelController(labelFile, DesignerContextMenuAddIn.Context);
 
        // Make sure the label doesn't exist.
        // What will you do if it does?
        if (labelController.Exists(labelId) == false)
        {
            labelController.Insert(labelId, labelText, String.Empty);
            labelController.Save();
 
            // Construct a label reference to go into the label property
            newLabelId = $"@{labelFile.LabelFileId}:{labelId}";
        }
    }
 
    return newLabelId;
}

Lastly, open the resource file and change the DesignerAddinCaption. This value will appear in the context menu item.

DesignerAddinCaption

To test your add-in, press F5 and Visual Studio will build your project and copy the dll to the appropriate folder. On my computer, the add-in folder is at C:\Program Files (x86)\Microsoft Visual Studio 14.0\Common7\IDE\Extensions\5hutepyf.xp2\AddinExtensions\.

Create a Dynamics 365 Unified Operations project.

Unified Operations project

Add a new table to the project.

Add a new table to the project

Add a label file.

Add a label file

Open your table in the designer and type a value into the Label property.

Type a value into the Label property

Right-click the table node in the designer and move your mouse to the Add-ins menu.

Addins menu

Click the Create labels option and your add-in will create a label resource and update the Label property.

Label property

Label property


Quick Modification for Tracing Bug Code in a Dynamics AX Production Environment

$
0
0

This quick modification for tracing bug code in a Dynamics AX production environment was used at a client site. I have received their permission to blog about this as I thought it was pretty useful.

Basically, the modification consists of the creation of an empty security role. When a user reports a bug, they may be asked for more detailed repro steps within the production environment. The user will be added to this security role, which will trigger the dumping of the X++ call stack into the Infolog when the error is generated. Once the repro is complete, the user is simply removed from the security role, and the logging is stopped. For the bug repro, the user may need to have running code in CIL disabled so the full call stack can be retrieved as well.

Part 1. Create an empty security role in the system

  • Navigate in the Dynamics AX 2012 client System administration > Setup > Security > Security roles
  • Click the New button
  • Fill in pertinent information

Create an empty security role in the system

  • Click the Close button

Part 2. Modify the info class, add() method

Change the method to the following code (no changes in the latter half of the method, so just make the displayed modifications:

Exception add(
    Exception _exception,
    str _txt,
    str _helpUrl = '',
    Object _sysInfoAction = null,
    boolean buildprefix = true)
{
    int numOfLines,i;
    int actionClassId;
    container packedAction;
    xSession session;

    // START - Add callstack to infolog 
    #Define.mySecurityRole('EnableAXDebugging')

    System.Diagnostics.StackTrace   myStackTrace;

    container                       myCallStack;
    int                             cntr;
    str1260                         whatToWrite;
        
    SecurityUserRole                securityUserRole;
    SecurityRole                    securityRole;
    boolean                         dumpCallStack = false;

    while select AotName from securityRole
        join securityUserRole
        where securityUserRole.User == curUserId()
        && securityUserRole.SecurityRole == securityRole.RecId
    {
        if (securityRole.AotName == #mySecurityRole)
        {
            // if we find the security role, set our X++ call stack dump variable, and quit searching as we are done
            dumpCallStack = true;
            break;
        }
    }


    if (dumpCallStack)   
    {
        // determine if running as native X++ or as IL code
        if (xSession::isCLRSession())       // IL code
        {
            myStackTrace = new System.Diagnostics.StackTrace(true);

            _txt += ' - ' + myStackTrace.ToString();
        }
        else
        {
            myCallStack = xSession::xppCallStack();
            for(cntr=1; cntr<=conlen(myCallStack); cntr++)
            {
                whatToWrite += conpeek(myCallStack, cntr);
                if (cntr mod 2)
                {
                    whatToWrite += '-Line: ';
                }
                else
                {
                    whatToWrite += "\r\n";
               }
            }
            _txt += ' \r\n Call stack: ' + whatToWrite;
        }
    }

    // END - Add callstack to infolog

NOTE: there is a rough stub for capturing the CIL call stack as well.

Part 3. Add the security role to the user

Within the client, navigate System Administration > Common > Users. Select the user by double-clicking, and add the security role to the user by clicking the Assign roles button

Add the security role to the user

Click the OK button once the debugging role has been selected.

Part 4. If needed, disable running business logic in CIL

In the client, navigate File > Tools > Options > Development tab. Uncheck the Execute business operations in CIL checkbox

Disable running business logic in CIL

Click the Close button.

At this point, you should be able to run a process, and see the call stack in the Infolog when the error is generated.

Error

Once this has been captured, simply go back into the user, and remove the debugging security role from the user. If the Execute business operations in CIL checkbox was modified, go back and correct that setting as well.

I hope that you find this useful, and it provides you something you can add to your ‘bag of tricks’ for debugging or troubleshooting any Dynamics AX issues.

New Report Fields Won’t Display on a Precision Forms Enabled Report in Dynamics AX

$
0
0

Recently, I was making some customizations to a report in Dynamics AX. I was adding a handful of new fields. The report was Precision Forms enabled and the new fields I had added were not displaying on the report. It should be an easy fix, but it took me a bit to find the issue below.

I checked various things:

1. I verified the dataset was refreshed on the report.

  • To do so, open the report in Visual Studio.
  • Right-click on the data set that you have modified and click refresh

PrecisionForms enabled reports

2. I verified the new fields were in the dataset of the report.

  • If not, verify your fields are selected in the field list by selecting your query and selecting the appropriate query/DP class from the list. This will open the field list below and you can select the checkbox for the fields you want to add.

PrecisionForms enabled reports

3. What I didn’t know was that you must also add your new fields in the setup of precision forms for that report.

  • Go to the precision forms setup
    • System Administration > Setup > Bottomline
    • Click enabled reports and select the report you are modifying.


  • Click the Related Tables button

PrecisionForms enabled reports


  • Select the table you have modified and add the new fields to the list here.

Simple solution, hopefully, this will save you some research time when working with Precision Form reports!


Class Variables, AOS Crashes, and Compile Forward in Dynamics AX 2012

$
0
0

Recently I made the transition from Dynamics AX 2009 to Dynamics AX 2012 and continue to learn all the differences between the two (I know, it’s 2018!). That being said, I was tasked with making a minor change to the dialog for project estimates which originates in the ProjControlPeriod class.

Simple. I add my new class variable, create my “parm” method, update the main method to set my new variable, and add my extra five lines in the class to perform what I need for the requirements. Done.

I open up the dialog, fill it in, click “OK” and instantly the AOS has crashed.

I restart the AOS – no need to open DEV because this is a very simple change, just going to test it real quick. Open the dialog, fill it in, click “OK”. Bang! The AOS has crashed again.

Restarting everything again.

So now it’s time to be a bit more cautious. I get everything started up, put in a breakpoint at the top of the main method of the class and off we go. Debugger starts, and I start stepping over each line. There’s where I get the value for my new variable, here’s my new parm method. I know nothing is wrong with that, so I step over and there goes the AOS again. Now I’m annoyed. That couldn’t have been right.

Restart everything again.

I look at the main method. I look at my parm method. Everything is good. Something weird’s going on, but what? I begin stepping over each line again. I get to the call to my new parm method, I step in, I get to the line where the value gets assigned and…

Restart everything again!

So what’s going on! I trace back to before I assign my new variable and start examining things. HUH? Where’s my variable? I examine my class and my variable isn’t there. I quit the debugger, look at my code, looks good, trace back to the assignment, nope no variable.

I try everything I can think of, recompile, incremental CIL, full CIL and after a few more AOS crashes I reach out to a co-worker for anything he can think of…

Compile forward

The compile forward feature in AX 2012 is something that I never needed in AX 2009. There might have been a reason, had I worked in that environment for another eight years, but it wasn’t something I’d ever needed. During development, you make your changes and save them which will perform a simple compile of the class. Compile forward, which is available by right-clicking your object and under the Add-Ins, will compile your object and anything else that references that object.

Compile forward

So, in my example, ProjControlPeriod’s construct method will actually choose one of eight other classes to instantiate that extend the ProjControlPeriod class. Even though all my code was within the ProjControlPeriod class, once one of the other classes (in my case ProjControlPeriodCreate) was instantiated, it didn’t know about my new class variable and the moment I tried to assign it is when I would lose the AOS.

A long story for what now seems such a simple thing. Hopefully, the hours of my frustration can benefit others out there.

Creating a List Panel for a Field Lookup in Dynamics AX

$
0
0

I recently had a scenario where we had to create a new vendor attribute that could have one or more values assigned to a vendor. The requirement wanted a drop-down field that opened a form and showed which values had been selected and which ones are still available. The lookup form should also allow the user to add/remove values. I was able to use an extension of the SysListPanel to accomplish this. I referenced form SysUserGroupInfo (Sys admin > Users > User groups). There are also list panels specific for financial dimensions. Form DimensionFocus (General ledger > Chart of accounts > Dimensions > Financial dimension sets) is an example. Here’s how you would go about creating a list panel for a field lookup in Dynamics AX.

Prerequisites

  • EDT created for the new attribute field
  • New table created to store the new attribute values and relation to the parent. For example, VendAccount if this is a new attribute for vendors. In this example, the new table has tow fields – VendAccount and CombinedCode.
  • The new field is added to the ‘parent’ form. Example VendTable if the new field is an attribute of a vendor. In my scenario, I also added the table in #2 as a datasource of the form.
  • New table created to store the new attribute values that are available. Similar to VendGroup. This table should be set to the Form Help of the new EDT in #1. This is like a setup form that will store categories that can be assigned to the vendor.

First, we need to create a form that will be used as the lookup form. This will be what is displayed when the drop down of the field is clicked.

Lookup form:

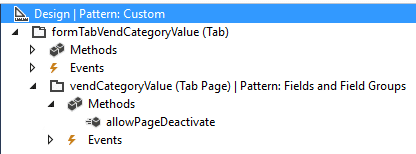
1. I used the Custom patter type since this form really won’t have any grids, action pain, etc. I set the Style property to Lookup and set the Show Delete / New Button to No. These properties are on the Design.

Creating a list panel for a field lookup


Creating a list panel for a field lookup

2. I set the auto declaration of the tab page control to Yes.

3. Add a datasource. This will be the new table that is created to store the new attribute values.
There is very little coding needed for this. You need to override the Init and close methods of the form and I created a Validate method. You will need to override the Active method of the datasource as well.

There is very little coding needed for this.  You need to override the Init and close methods of the form and I created a Validate method.  You will need to override the Active method of the datasource as well.

Override the init method of form

1. In the init method is where you initialize the SysListPanel. I used the SysListPanelRelationTableCallBack

public void init()
    {        
	 // create new panel that will show the selected and available categories
        sysListPanel = SysListPanelRelationTableCallback::newForm(element,
                             element.controlId(formControlStr(SSIVendCategoryValueTable, vendCategoryValue)),
                             "@SYS24159", "@SYS30545", 0, //#ImageUser,
                             tablenum(SSIVendCategoryValueTable),
                             fieldnum(SSIVendCategoryValueTable, CombinedCode),
                             fieldnum(SSIVendCategoryValueTable, CombinedCode),
                             tablenum(SSICategoryValueTable),
                             fieldnum(SSICategoryValueTable, DeptCatCode),
                             [fieldnum(SSICategoryValueTable, DeptCatCode), fieldNum(SSICategoryValueTable, DepartmentCategoryDesc)],
                             0, '',
                             identifierstr(Validate), '', '');
      
        super();

	 //set the record from the caller
        ssiVendCategoryValueTableRec = element.args().record();
        sysListPanel.init();		
    }

2. Details of SysListPanelRelationTableCallback::newForm()

  • The first few parameters are for the form and the form id.
  • Then you can set captions for the Selected and Available columns.
  • You can use an image for the form but I did not in this example.
  • Then you list the table that will be the source of the new data. In this example, it is called SSIVenCategoryValueTable.  This would be the table that is created in the prerequisites.  In my example, the relation and range field was the same.
  • After that, the ‘source’ table and fields are defined. This is the ‘parent’ relation.  The table that will be the source of the caller.  In my example, there is a relationship between the CombinedCode and DeptCatCode between the two tables.
  • After that, it is a container that will have the fields that will appear in the list panel. In my example, I have two.  The Code and Description.
  • In my example, I did not set the range field or value here. That is done in the Active method of the form datasource.
  • I did create a Validate method but did not create selectedMethod or availableMethod.

3. In the last part of the init method, I set the caller recId and then the init method of the list panel.

Override the close method of form

All that I put in the close method of the form is a call to the finalize method of the list panel. This will ensure all actions have been completed of the list panel to help ensure no errors occur when the form closes.

public void close()
    {
        sysListPanel.finalize();
        super();
 }

New validate method

I didn’t need any special validation for this solution. I just return a true value. This is similar to how the sysUserGroupInfo form does it.

boolean validate(userId _userId, AddRemove _addRemove, SysListPanelRelationTable _listViewHandler)
    {
        return true;
    }

Override the active method of datasource

This is where I added the ranges for the list panel and also where the call to fill the list panel happens. We need to make sure that we are only returning the new attribute values for the vendor that has been selected in the caller form.

[DataSource]
    class SSIVendCategoryValueTable
    {
        /// <summary>
        /// active method for datasource SSIVendCategoryValueTable
        /// </summary>
        /// <returns>
        /// int
	 /// </returns>
        public int active()
        {
            int ret;
    
            ret = super();
    
			// set parms for range field and value
            sysListPanel.parmRelationRangeField(fieldNum(SSIVendCategoryValueTable, Vendor));
            sysListPanel.parmRelationRangeValue(ssiVendCategoryValueTableRec.Vendor);
            sysListPanel.fill();

            return ret;
        }

    }

Tab page method allowPageDeactivate

The last piece of coding on the form is to add some logic to the allowPageDeactivate of the tab page control. This will handle any updates that are needed based on changes made to the list panel.

[Control("TabPage")]
    class vendCategoryValue
    {
        /// <summary>
        /// saves any changes made to record values
        /// </summary>
        /// <returns>
	 /// boolean
	 /// </returns>      
        public boolean allowPageDeactivate()
        {
            boolean ret;
    
            ret = super();
    
			// create new record if one doesn't already exists
            if (!SSIVendCategoryValueTable.RecId)
            {
                if (SSIVendCategoryValueTable_ds.validateWrite())
                {
                    SSIVendCategoryValueTable_ds.write();
                }
                else
                {
                    return false;
                }
            }

            return ret;
        }

That is all the coding that is needed for this functionality. The List panel will handle adding/removing any records from the tables. After all of this, you get something like the below.

Creating a list panel for a field lookup

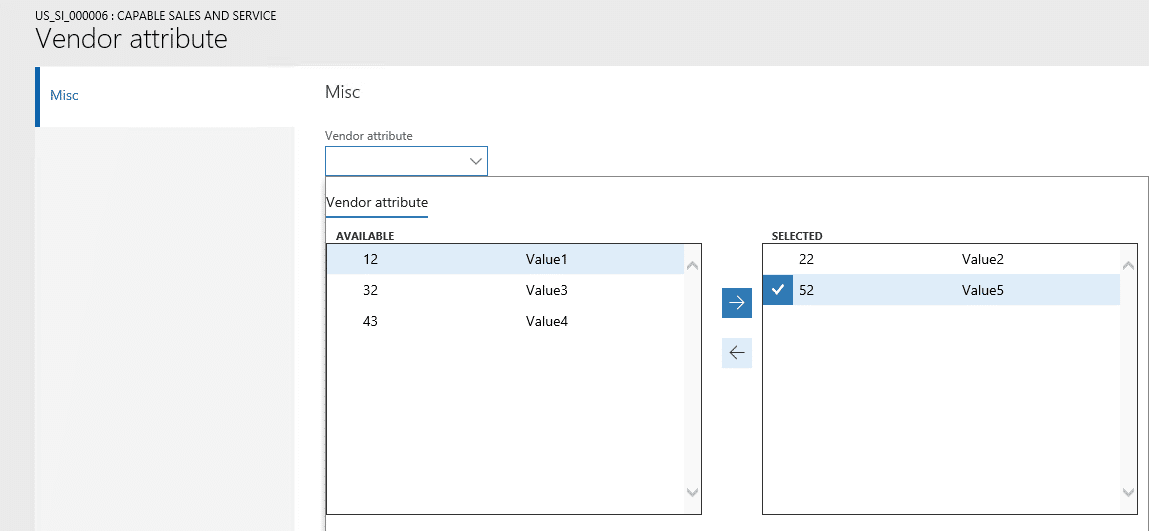
When you click the drop down of the new vendor attribute field the lookup form appears. You can use the left/right arrows to add/remove values. The selected values are the records that are stored in the new table created in the prerequisites. It will store the value and the vendor. The values listed in the Available are from the table of the new EDT.

How to Use Docker Containers for Dynamics NAV

$
0
0

Wondering how to use Docker Containers for Dynamics NAV? The first step on getting started with Docker Containers is selecting the Docker Container Tag from this list at hub.docker.com. This will be used in the place of <ReplaceWithDockerTag>.

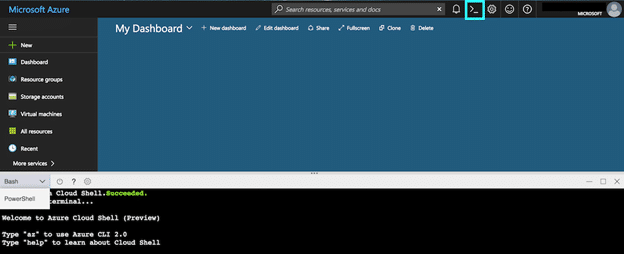
Next Open Portal.azure.com – Click on Cloud Shell Icon

Docker Containers

If you have never used Cloud Shell, you can find a great Overview of Azure Cloud Shell here.

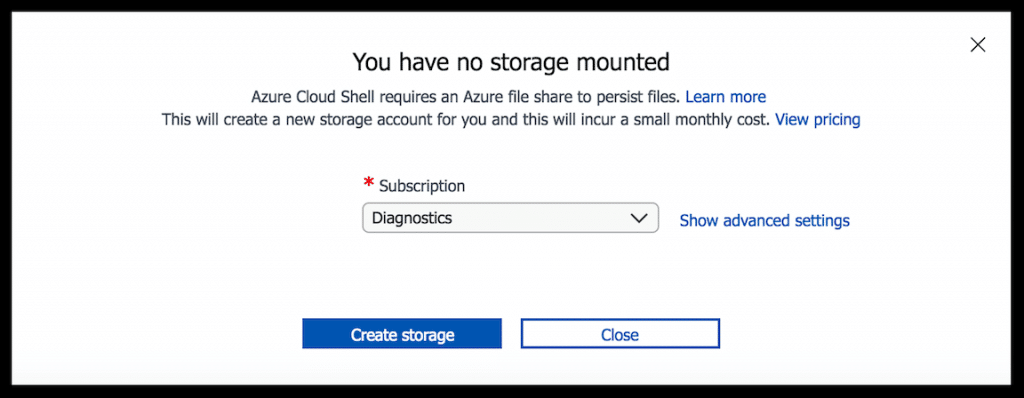
Next, Create a Storage Account, if you do not have one already.

Docker Containters

For our examples, we will Run Cloud Shell – Bash (You may need to change from PowerShell).

Docker Containers

If this is your first time Creating an Azure Container, you will need to first Create Resource Group. This only has to be run once.

az group create --name DockerContainersNAV--location eastus

Now, for the moment we have all been waiting for!  Let’s Create a Docker Container!

az container create --name <ReplaceWithDockerTag> --image microsoft/dynamics-nav:<ReplaceWithDockerTag> --resource-group DockerContainersNAV --os-type Windows --cpu 2 --memory 3 --environment-variables ACCEPT_EULA=Y --ip-address public --port 443 1433 7046 7049 8080

Let it run for 10-15 Minutes – Provisioning times for Docker Containers may vary 😊

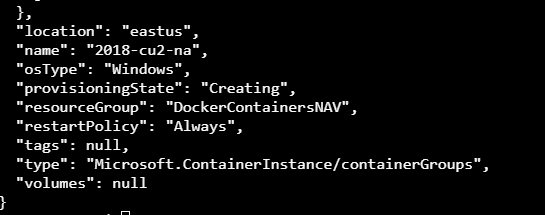
If you are impatient and want to check the Provisioning State status now, run the following command:

az container show --resource-group DockerContainersNAV--name <ReplaceWithDockerTag>

Docker Containers

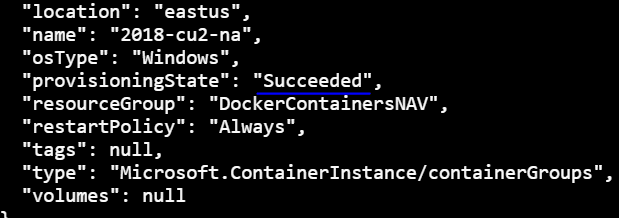
Once the Azure Container is finished the “provisioningState” will be “Succeeded”.

Docker Containers

Now that your Docker Container is running, you need to look at the details of what you just created.

You will need to run the following command:

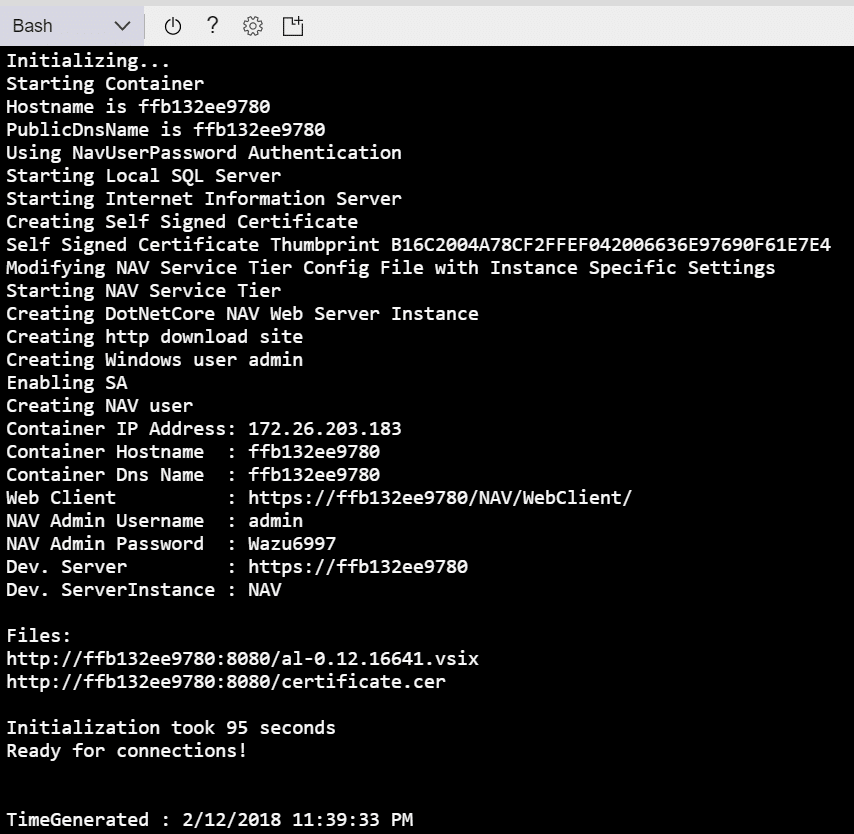
az container logs --resource-group DockerContainersNAV --name <ReplaceWithDockerTag>

Docker Containers

Make note of the Following:
• NAV Admin Username
• NAV Admin Password
• Container DSN Name
• Certificate.cer URL

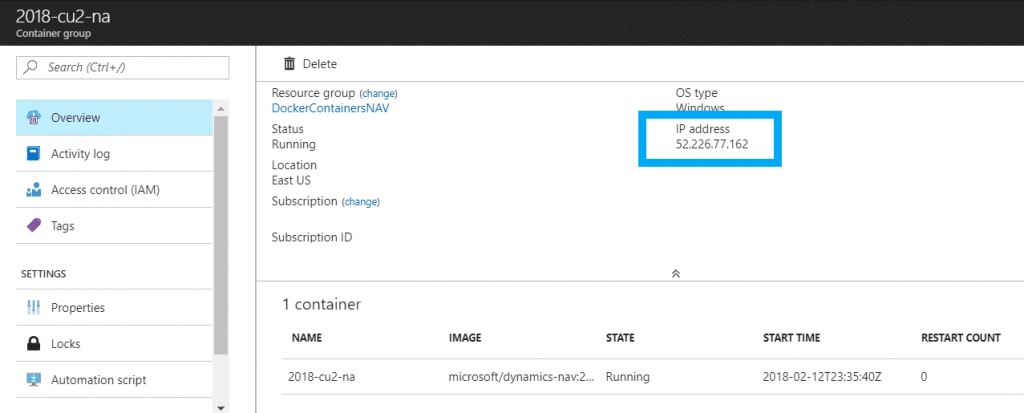
Next, you will need to find the Public IP Address by Searching for the Container Group you created with the <ReplaceWithDockerTag>

Docker Containers

Now for the tricky part.  You will need to use the Poor Man’s DNS, because the DNS that the Docker Container created is just random Hex Values. To do this, navigate to the following:

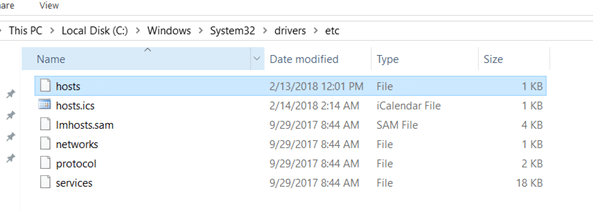
C:\Windows\System32\Drivers\ETC\

You will see a file Named Host without any extension. Right Click on the file and Open with Notepad Editor

Docker Containers

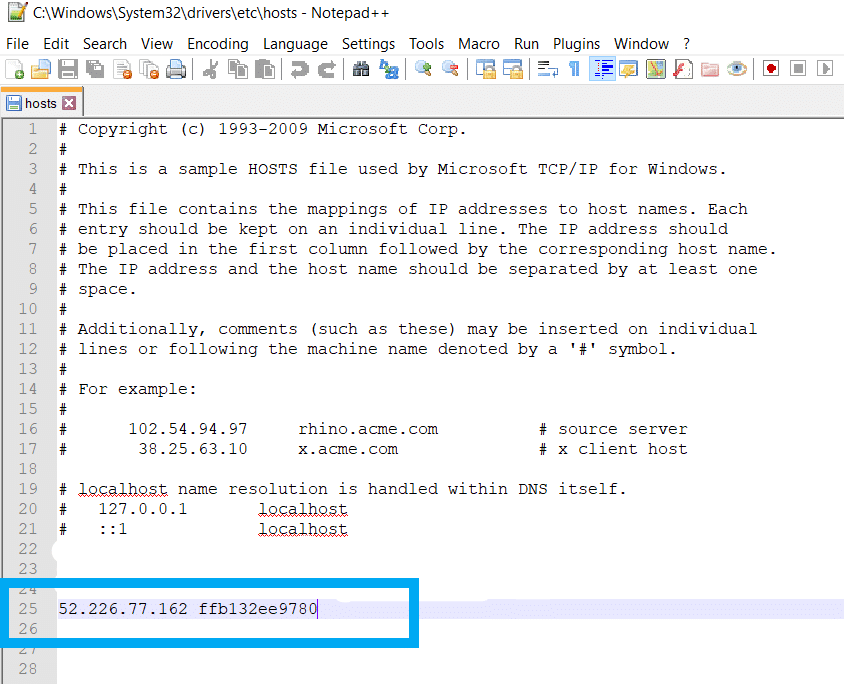
Add the Public IP Address, then a space, then the Container DSN Name.

Docker Containers

Save the file and make sure it doesn’t have an extension. The file name should just be host’s.

You can test your Poor Man’s DNS by navigating to the Certificate.cer URL:

http://<ReplaceWithContainerDNSName>:8080/certificate.cer

Docker Containers

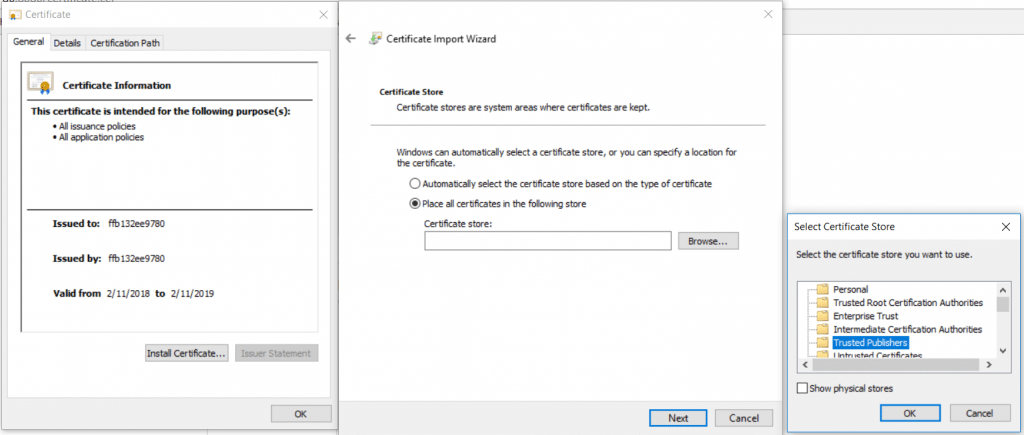
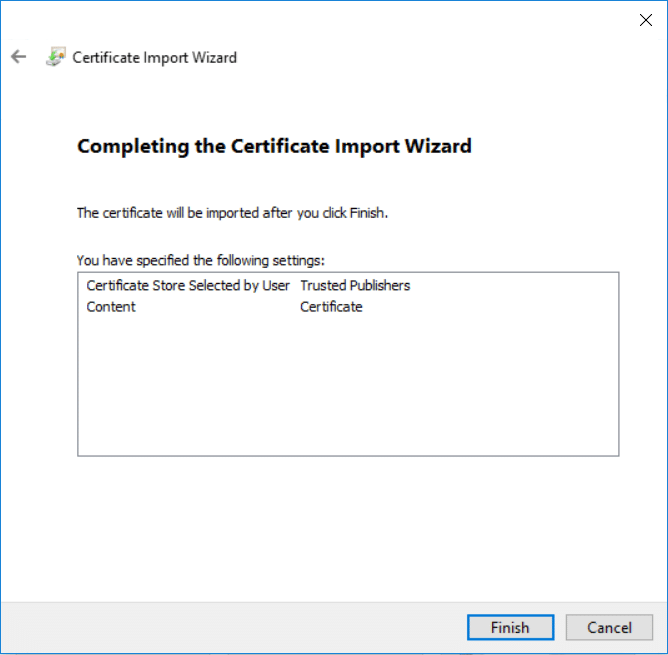
You will download the Certificate.cer and install in the Trusted Publishers Certificate Store.

Docker Containers

Docker Containers

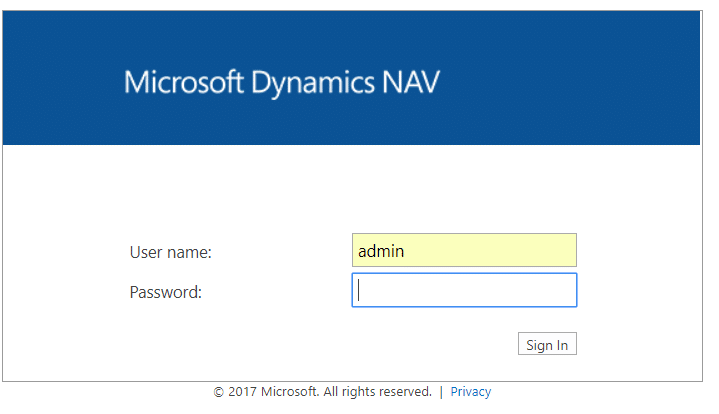
Now you are ready to Navigate to the Web Client

https://<ReplaceWithContainerDNSName>/nav

You will use the NAV Admin Username and NAV Admin Password you got with the logs command:

az container logs --resource-group DockerContainersNAV --name <ReplaceWithDockerTag>

Docker Containers

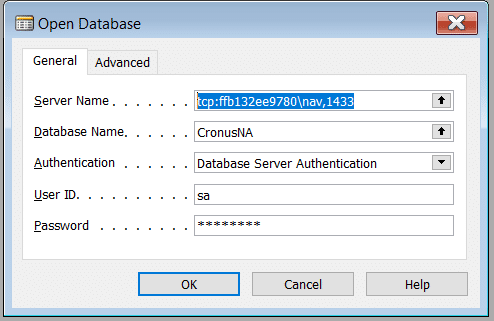
But what about the DEV Client?  You will need to add some special syntax to connect:

Docker Containers

  1. You will need to enter tcp:<ReplaceWithContainerDNSName>\nav,1433
  2. Change Authentication to Database Server Authentication
  3. User ID will be sa – SQL Admin
  4. Password: will be the NAV Admin Password
  5. Select the Database Name CronusNA

You are ready for DEV in your new Azure Docker Container!

Exporting Text Format Positive Pay File in Dynamics 365 for Finance and Operations

$
0
0

In Dynamics 365 for Finance and Operations, the default format of the Positive Pay output is XML. Microsoft has provided steps for the setup of Positive Pay as well as a sample XSLT file used to transform the output.

However, it is possible to create your own XSLT file for text or CSV format. The following sample code creates a fixed length text file but could be modified easily for CSV format. Note the output method highlighted below. Here is a link to the string manipulation functions used in the sample.

<xsl:stylesheet version="1.0" xmlns:xsl="http://www.w3.org/1999/XSL/Transform" xmlns:msxsl="urn:schemas-microsoft-com:xslt" exclude-result-prefixes="msxsl xslthelper" xmlns="urn:iso:std:iso:20022:tech:xsd:pain.001.001.02" xmlns:xsi="http://www.w3.org/2001/XMLSchema-instance" xmlns:xslthelper="http://schemas.microsoft.com/BizTalk/2003/xslthelper">
  <xsl:output method="text" omit-xml-declaration="yes" indent="yes"/>
  <xsl:template match="/">
      <xsl:for-each select="Document/BankPositivePayExportEntity">
        <!--Cheque Detail begin-->
        <xsl:value-of select='string("C02800")'/> 
        <xsl:value-of select="substring(concat(ACCOUNTNUM/text(),'          '),1,10)"/>
        <xsl:choose>
          <xsl:when test='CHEQUESTATUS/text()=normalize-space("Void") or CHEQUESTATUS/text()=normalize-space("Rejected") or CHEQUESTATUS/text()=normalize-space("Cancelled")'>
            <xsl:value-of select='string(" VD ")'/>
          </xsl:when>
          <xsl:when test='CHEQUESTATUS/text()=normalize-space("Payment")'>
            <xsl:value-of select='string(" RA ")'/>
          </xsl:when>
          <xsl:otherwise>
            <xsl:value-of select='string("    ")'/>
          </xsl:otherwise>
        </xsl:choose>
        <xsl:variable name="cknumpadded" select="concat('0000000000',normalize-space(CHEQUENUM/text()))"/>
<xsl:value-of select="substring($cknumpadded, string-length($cknumpadded) - 10 + 1, 10)" />
<xsl:variable name="amtdec" select="substring-after(AMOUNTCUR/text(), '.')" />
<xsl:variable name="amtval" select="substring-before(AMOUNTCUR/text(), '.')" />
<xsl:variable name="amtpadding" select="concat('00000000', $amtval)" />
<xsl:variable name="amtpadded" select="substring($amtpadding, string-length($amtpadding) - 8 + 1, 8)" />
<xsl:value-of select="concat($amtpadded,'V',substring($amtdec,1,2))" />
<xsl:variable name="year" select="substring(TRANSDATE/text(),3,2)" />
<xsl:variable name="month" select="substring(TRANSDATE/text(),6,2)" />
<xsl:variable name="day" select="substring(TRANSDATE/text(),9,2)" />
<xsl:value-of select="concat($month,$day,$year)" />
        <xsl:value-of select='string("                    ")'/>
<xsl:variable name="blk128" select='string("                                                                                                                               ")'/>
        <xsl:value-of select="substring(concat(BANKNEGINSTRECIPIENTNAME/text(),$blk128),1,128)"/>
        <xsl:text>&#13;&#10;</xsl:text>
      </xsl:for-each>
  </xsl:template>
</xsl:stylesheet>

It is important to note that when generating the Positive Pay file and the Open or Save prompt appears, you must change the file type to Txt. See the following screenshots.

1. Upload the transformation file as per the instructions in the link at the beginning of this article.

Exporting text format Positive Pay file

2. Generate Positive Pay

Positive Pay file in Dynamics 365 for Finance and Operations

3. Select Save As and save the file as Txt.

Exporting text format Positive Pay file

Exporting text format Positive Pay file in D365 for Finance and Operations

Special thanks to my teammate Karl Gunderson for lending his XSLT expertise to this project on how to export a text format positive pay file in Dynamics 365 for Finance and Operations.


What’s New for Developers in Dynamics 365 for Finance and Operations? – Two-day Training

$
0
0

Are you a developer experienced in Dynamics AX 2009 and Dynamics AX 2012, but you need to level up your knowledge and skills for the newest product release? If so, we’ve created a course just for you! Stoneridge Software is offering a new training course, “What’s New in Dynamics 365 for Finance and Operations.”

“What’s New for Developers in Dynamics 365 for Finance and Operations” is a two-day class held online from 8:30 am – 4:30 p.m. with a lunch break. This training will provide students with an overview of the differences in development for those who have been working in Dynamics AX 2009 or AX 2012 and are moving to Dynamics 365 for Finance and Operations. It will cover architectural and development features and the tools available in the development environment. This workshop covers the essentials of doing development including creating tables, classes, forms, and reports. All students will have access to an environment for labs.

Register for training for Developers in Finance and Operations here.

What’s New for Developers in D365 for Finance and Operations Course Outline:

Visual Studio Overview

  • Projects
  • Solution Explorer
  • Working with Projects
  • References
  • Debugging

Architecture

  • IIS
  • Models
  • VS Project types
  • ModelUtil
  • Deployment Packages
  • Export/Importing Code
  • AOT

Tables and UI

  • Changes to Base Enums
  • Changes to Tables
  • Changes to Forms
  • Tiles
  • Menus
  • Workspaces
  • Labels

Changes in X++

  • Refresh of debugging
  • New base data typer
  • New look of boxes/dialog
  • New look of Infolog
  • Cross-company support
  • Working with files

Changes to Security

  • Data Entity Permissions
  • Direct Access/Field Level Permissions
  • Form Control Overrides

Data Entities

SSRS Reports

Register for Developer Training
Viewing all 118 articles
Browse latest View live